
Hello hello hello !!! How are you guys ? As you may guess, I’m in a very good mood. I don’t know why 🙂 But still, I’m happy ! Maybe it’s because Spring finally came back. =) Anyway. It’s a quite good thing as those next days are going to be quite tough. As school ends at Easter for me, my last school weeks before Eggs’ time are quite heavy. That’s why being organized is important, this way it’s less stressful, easier … So I decided to make a DIY in this spirit. I went for an organizing folder. The one I made for the blog isn’t the first one I have made. I have made severals of them during the past few years, and it has been very useful. That’s why I decided to show you how to make one. Who knows, there are maybe a lot of people who needs to get organized. Furthermore, this folder is very cheap and far more cuter than the expensive ones you can see in the supermarket 😉 🙂 Let’s get started !
For this DIY, you’ll need two pieces of cardboard, scrapbooking paper and two pieces of white A4 paper.
Use your A4 paper to cut the scrapbooking paper.
Glue the scrapbooking paper and the cardboard together(if your scrapbooking paper is very thick, you don’t need this piece of cardboard).

Cut another piece of scrzapbooking paper: same length as the A4 paper and 6 cm of wide.
Fold it on each side at about 0,5 cm from the outside. This would be the edge of the folder.
Glue this part to one of the two parts we previously made, like so:

Leave it to dry. During this amount of time, make the “accordion” parts(I don’t know how to call it, to be honest, this the word I usually use to describe it 😉 )
Cut 2 pieces of white paper like in the picture.
Fold each paper to get an accordion shape.
Now, glue them to your work, as shown.

Hide the cardboard with white paper. Again, let it dry, before going further.
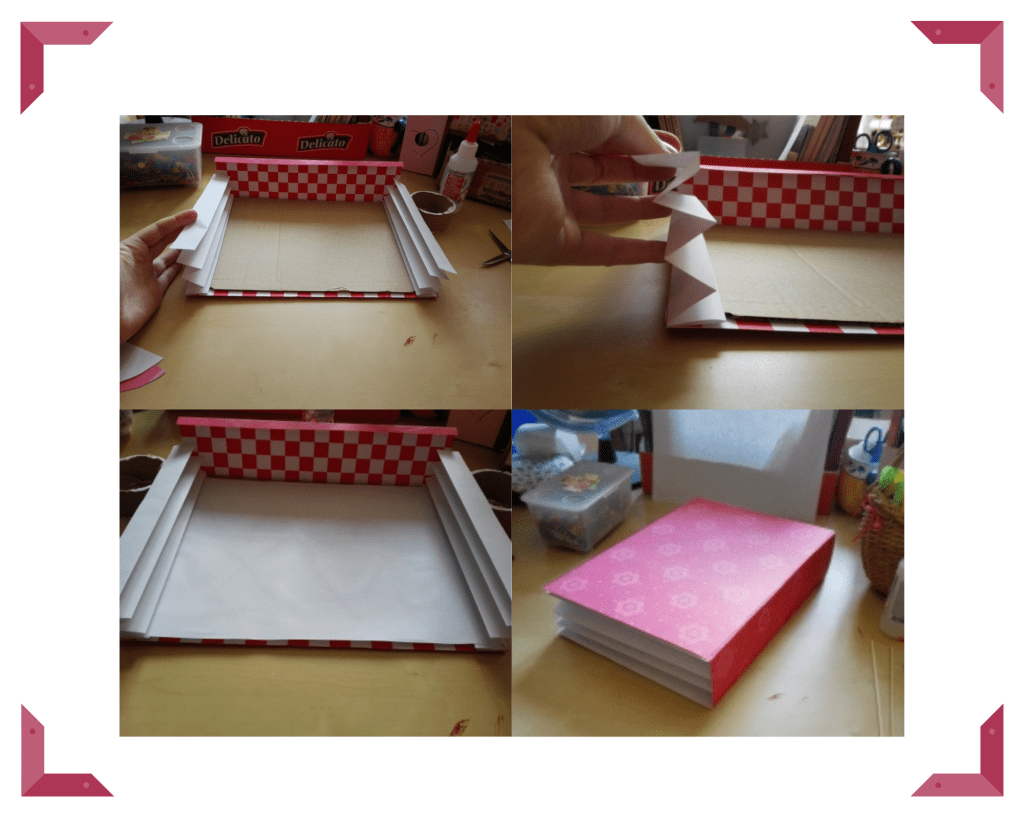
When this all dryed, glue the other part(remember ? the one we did at the beginnning)like we did to the “accordions” and the edge. Leave the whole thing to dry. I let it dry for one day, just to be sure( and also because I was doing other things 😉 )
After that, I made the dividor. I only made one because I just wanted to have 2 compartments in my folder.So, this very simple, take 1 A4 white paper, cut two pieces of scrapbooking paper(3 cm x A4 length). Fold in 2 each scrapbooking paper and glue it to the white paper.(the purpose is to made the dividor stronger) ( you can cut a A4 piece of scrapbooking paper as well; it’s up to you)

Finally, when the folder is all done, feel free to add further decorations. Personally, I added stickers. I have a confession to make: I love stickers ! =D I found it so cute. I think it’s an easy way to customize things up.

And here we are !

What do you think about it ? Do you like it ?
Honestly, I love how it turned out ! No doubt seeing this will make work easier 😉 🙂 This is one of the rare thing I like about school. When you have to get new stuff. That’s the funny part of Back-To-School period. 😉 (the only funny part)
I hope you liked this DIY as much as I did while making it. If you make your own folder too, please tell me and share it with me and the others on Instagram with #adysfolder I have to admit that I’m very excited about seeing your creations on this one!
That’s all for this week’s post, I hope you enjoyed it. Don’t forget to subscribe to the blog and to follow me on social media( Instagram and Telegram) informations, links are down bellow 🙂 ❤
Have a nice week ❤
Ady<3


One thought on “It doesn’t mean I love School ;)”