
Hi everyone ! Welcome back! How is Back-to-School going on ? Did get into a new school ? Did you make new friends ? Do you have new teachers ? To put in a nutshell, is it going well so far ? 🙂 Today I’m back with another Back-to-School post. I’ll share with you how I reorganized my working space and some DIYs for your desk. I hope it’ll give you ideas to make Back-to-School an even better time for you. 😉
Let’s get started !
First, let’s talk about my new working space. Until now, it was…. a real mess. 😥 It was more and more impossible to work properly ! I had to do something, that’s why I decided to rearrange the space. I’ll show you how it looks now and how it works, hoping it could give ideas to people in the same struggle 😉
Here is a global view of the space:

At the back, you have the big storage spot. Here I store big boxes with mess inside, most of the time, things I don’t use that much.

Then, here is the master piece:

In the middle I put a small table/desk with a drawer, and I created storages for sides. Let’s have a look on these.
On the left, at the bottom, I made shelves to store my fabric pieces; biggest at the bottom, smallest in the middle and others at the top.

Then, on top of these shelves I made a space to store all my threads. For the background I made two levels to put boxes/baskets. And for the foreground, I made a set with three boxes( three compartments) On top of this set I would just put two other closed boxes(filled with more threads)

And finally on top, I put a desk organizer I made a few years ago, using it to store papers, ribbons, raffia, feathers etc
Moving to the central piece, the desk itself. I put my sewing machine on top of it with a few random things. I used the drawer to store all my painting accessories.


Finally, on the right of the desk, I made another storing set. On the bottom, I put storages for my magazines(sewing magazines, MollyMakes etc) Then, on the top I made a shelf to store my wrapping papers, scrapbooking papers etc
And on top of this, I put an hold card displayer that I retrieved. I use it to store and display my small thread bobbins, some scissors, pens etc.

That’s it for my new working area. Now, let’s move to some DIYs for your desk. 🙂
#1-Tape Holder
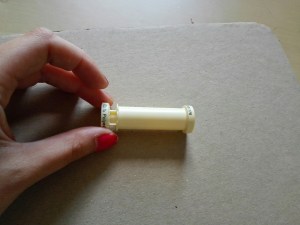
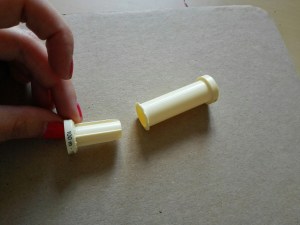
For this DIY, you’ll need cardboard, a bobbin, glue, paint and adhesive paste. Make sure that you use a bobbin with two parts fitting together(like the one on the picture), it’s very important for this DIY. Cut into the cardboard two little pieces, for example, shaped like a house, or just like a simple rectangle, as far as it’s stable. Separate the two parts of the bobbin and glue them on each cardboard piece.


Use adhesive paste to secure. Let it dry then paint it.

Finally, put the tape on one side and encase the two parts. Taddaa !! You got a cute tape holder that free one of your hands when working and needing tape 🙂


#2-Sharpener
You’ll need a chewing gum box, a simple sharpener, a craft knife and glue.
Remove any tag from the box. Using the craft knife, cut a hole into the lid, that’ll fit with the sharpener.


Then glue the sharpener inside the box on the lid. Let it dry.

And here is the final result. Easy, isn’t it ? 😉


#3-Pencil Case
Finally, let’s make a pencil case, or it wouldn’t be enough for the desk. 🙂
You would need a box like this one:

Cut off the excess and cover it with paper(or paint it)


Cut a piece of fabric(matching the box, of course 😉 ), hem it and glue it inside the box to make the top of the case.


Then put the thread into the hem that you previously made. At each end of the thread, attach a wooden pearl with a knot. This way, the thread woulod stay in place and not go back into the hem; furthermore it’s a cute way to decorate the case. 🙂


And here it is ! What do you think of this pencil case ?


Tell me, which one is your favourite ? For me, it’s the pencil case. I love it !
I hope you enjoyed this post as much as I did.
I wish you all the best, take care of yourself.
See you in a next post ❤
Ady ❤


Hello there! This post couldn’t be written much better! Going through this post reminds me of my previous roommate! He always kept preaching about this. I’ll forward this post to him. Pretty sure he’s going to have a great read. I appreciate you for sharing!
LikeLiked by 1 person
Oh thank you so much ! It’s very kind of you. Happy you liked this post. Ady ❤
LikeLike